


 24/7 Emergency Service
How to Replace a Toilet Supply line to Avoid a Water Damage issue in San Tan Valley and Mesa AZ
10/14/2020 (Permalink)
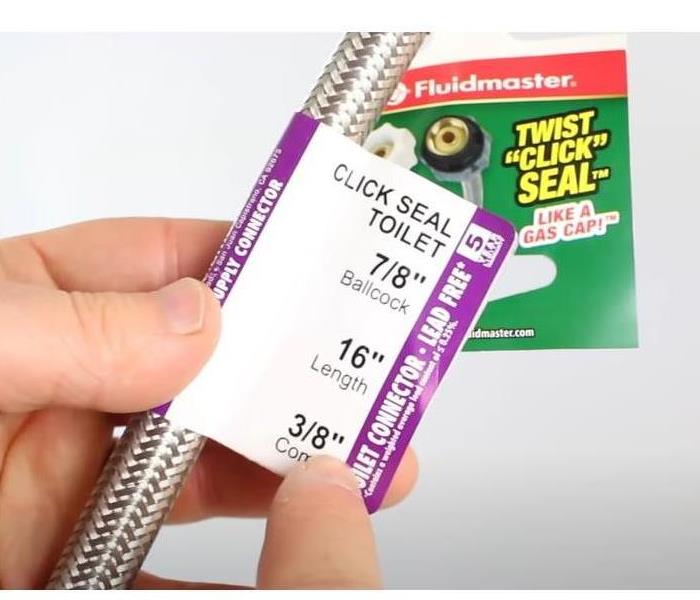 Replacement Toilet Supply Line Specification Tag
How to Change your Toilet Supply to Avoid a Water Damage Issue
One of the worst things that can happen in a bathroom is a water leak, especially at the toilet or at the bathroom faucets. So in today’s blog, we’re going to give you tips on how to replace the bathroom water supply lines for both the toilet and the sink and to do it without having to worry about any leaks. We are called out to water damage issues in Mesa, AZ and San Tan Valley quite frequently for losses due to supply line issues, so we wanted to make sure you had the information you need to avoid having your own water loss.
So for toilets, obviously, the water supply line is right behind the bowl and underneath the tank, and there are two points where they leak. Point number one is the connection between the water supply line and the shut-off valve. The second place where it leaks is where it connects to the fill valve of the toilet. Now, believe it or not, these water supply lines should be switched out every ten years because they do go bad. But if you live in an area where homes were put together real quickly and the construction was a little questionable, you might want to check it more often. And we highly recommend that you stick with steel braided water supply lines because of their strength and durability.
Step 1: Turn off the Water
The first thing you need to do is to turn the water off at the water supply line. And it doesn’t hurt to get a container and put it directly underneath where the fill valve is located. Typically, toilet supply lines are only hand-tight up against the fill valve of the toilet tank. So if that’s the case, you’ll be able to turn it clockwise if you’re looking down from the toilet tank. You can also use a set of pliers or channel locks if this is not hand-tight. Then, you will want to empty any water from the water supply line down into the container.
Step 2: Remove the Supply Line
Next, use pliers or a crescent wrench to remove the old supply line from the shut-off valve. Best thing to do is to take the old water supply line with you to the home store to make sure you get the right supply line. Again, we suggest getting a steel-braided supply line. We highly recommend this because they’re more durable than the other types.
There are four things to look for on the supply line tag tag when you go to your home store.
- First, Look to make sure it has the correct connection. For example, if your current toilet setup has a click seal connection, you will want to look for a “click seal toilet” water connector.
- Second, you will want to make sure the connection is the right size connection (?”, etc)
- Thirst you will want to make sure it is the right length
- Finally, you need to know the compression fitting size that connects up with your shut-off valve.
Step 3: Installing the new supply line
The connection that goes up against your fill valve works just like a gas cap. So you’re going to twist it on, you’ll hear the click, and you’ll know that it’s sealed properly. So there’s no guessing. You’re going to attach the click seal water supply line at the shut-off valve first. So just thread it on by hand, and then tighten it until it’s nice and snug, but it doesn’t have to be too tight. Then you’re going to tighten the top connection until we hear the click so you know it’s tight enough.
Then all you need to do is turn the water back on at the shut-off valve. Finally, you just want to check and see if there are any leaks at this point and down at the shut-off valve, and when you see that there are none, you are good to go.
If you’re not sure what size fitting you have between the shut-off valve and the end of the water supply line, there’s a kit that you can get. It’s called the Universal Click Seal toilet connector kit. It comes with three different fittings—one, two, three—that fit into the water supply line. The gold fitting is 3/8”. The black fitting 7/16”. And the silver fitting is ½”. The fittings are really easy to use. You just need to determine which one you need for your shut-off valve. For example, if your shut-off is ½”, you take the silver adaptor and you thread it into the metal nut of your water supply line. Now, the cool thing is you can get the same universal click seal kit for water faucet supply lines. So just keep that in mind if you’re going to be searching for those at the store.
For water faucet supply lines, it does help to have certain tools. You will want to have a basin wrench. Basically, if you’ve never used one of these before, it can reach up underneath the sink here, and it can grab onto the existing water faucet supply line that’s connected to the faucet.
Check your Sink Supply lines as well
Start this by turning off the water supply at the shut-off. By the way, if you have a bad shut-off valve, well post another blog post on how to replace them. So again, the water supply lines should be replaced every ten years, and where they leak most is at the connection or at the connection with the shut-off valve or up at this connection between the faucet and the supply line. We find it helpful to slide the basin wrench up along the existing supply line and put it right on top of the nut. And then you can turn it counter-clockwise to loosen the nut that’s up against the bottom of the faucet. Then remove the rest of the nut by hand. It’s really easy to do this once you get the hang of it, but sometimes it takes a while. So again, just use a crescent wrench to loosen this nut that’s connected to the shut-off valve. Any time you see rust or corrosion on these supply lines, that’s a sure sign that you should replace these. A lot of the time the sink supply lines will have a tag that shows how long the supply line is along with the fittings it has. Hopefully the print on the tag is still legible on yours when you go to replace it. You can also use a click seal supply line to replace the sink supply line as well. What’s nice with these is you don’t need any tools to attach this to either the shut-off valve or the faucet. So, no tools necessary.
You’ll want to tighten this onto the shut-off valve by hand. This part will not make the clicking sound, so you’re just tightening this until it won’t go any further by hand, but you don’t need any tools. Next, do the faucet connection and you will hear the clicking sound once it’s tight enough. Okay, now you just need to turn the water on and check your connections. So if there are no leaks you are good to go.
As I said in the beginning, these water supply lines, when they go bad, can be a real nightmare. We deal with these issues all of the time and they are one of the most common reasons we have seen that people have a water loss in their home. So hopefully these tips will help you out.
If you have any questions, let us know. Feel free to send us a message through our Google my business listing at g.page/SERVPROofnorthcentralmesa (Make sure to use the mobile app with the message function) or call us at (480) 553-7103 and we will be more than happy to assist you with any questions you have.
I’d be happy to answer your questions. Take care.